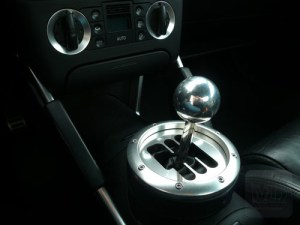
Basement cleaning… I found a brand new DMC Roof Spoiler!


Wow time passes by so fast! I’ve only done one quick ride with the TT this year. I took nice pics though 🙂

I also did some basement cleaning and found a brand new DMC roof spoiler! (Also called louver). Let me know if interested, I’ll ship it to you. Pricing below.

Audi TT Rear Window Covering (Roof Spoiler): 319$ US + Shipping to Canada or USA
DMC Tuning’s Audi TT Rear Roof Spoiler looks very good once painted and installed on your TT. It allows you to lower the TT color lower onto the back glass, which is good for custom paints or designs. It’s another easy way to distinguish your TT from others.

Posted in Uncategorized | 2 Comments

1st time out of storage… Post Covid!


Yep, I took the TT out for a drive yesterday evening, almost 1 year after storing it for winter. Covid struck us all and I found myself very busy at work with no time to enjoy long drives. So the TT stayed in storage all summer long! 😭

Looking forward to today’s drive!

Cheers, fellow TT enhousiasts!

Andre-M.

Posted in Uncategorized | 9 Comments

2017 season almost finished!


Yep. It’s time to think about storing the TT again. 2017 is almost over, with just 1000 kilometers more than last year. I havent had much time to ride it :/

So I’m making every minute count and shot these pics earlier this morning. I’ll have something to look at in the next long Canadian winter months. 🙂

How about you followers, how was 2017?

Posted in Uncategorized | 11 Comments

12 years later, I’m still at it!


Yes, my beloved is 12 years old now! But I’m still working at it to make it better, this year again. Although some of you probably think I’m destroying an already perfect car (which is true) my goal is to make it mine, a reflection of my taste and… of the $ I’m ready to throw at it 🙂

My point: It’s mine and everything I do to it is well thought and will always be a work in progress. I don’t mind opinions, so feel free to give yours below this article.

So 2017 brings a lot of fun! 1. The completion of my 1 year Land Rover Defender rebuild which is due in June (haven’t blogged on it yet, but just think LS3 and much more…) and 2. More stuff on the TT. By stuff i mean a cluster repair, dial fascia replacement, double din radio install, full speaker replacement and addition of a subwoofer.

So here are a few pics of where I’m at! Enjoy.

Cluster (a complete cluster is about $1000 us. The LCD screen goes from $30 to $99. I ordered both to be able to compare them.)

Fascia (simple black to white replacement, from Lockwood)

Sound system (the Bose original equipment is not bad at all. But if, like me, you appreciate ‘very’ good sound quality in your car, it’s just not enough, and I’m not talking boom boxes)

More to follow in the next month.

Cheers,

Andre

Posted in Audi TT MK1 | Tagged , , , , , | 12 Comments

What does it feel like to drive an F1?


Hey fellows,

Here’s a new line I can cross of my bucket list:
Drive a Formula One on a race track in Europe

Video here:

Ain’t that great??

I’ve been asked so many questions that I assembled this short video for my friends and family. Thought I’d share it with you guys.
The one question that was on everyone’s lips was: “How does it feel?”. Kinda obvious answer usually follows… It’s A-W-E-S-O-M-E!!! – Look at my smile at the end of the video! lol

But shhhh I’ll tell you the thruth…

I’ve driven really fast cars both on and off track in my 40+ years on this planet. F3, F2000, F1600, supercars, my TT :), etc. So I was expecting to get my a** kicked and get a headache from the G forces, but in reality, it was… OK.
Yeah, I know. Disappointing isn’t it?
Don’t get me wrong, I loved, I mean l-o-v-e-d every second on track. But I was expecting WAY more engine power. Braking was brutal, but nothing like I had never seen. It’s just very fast and ultra lightweight. I didn’t have to fight it, it drove nicely without me having to compute with both managing the track and the car. I was able to concentrate on the track and focus on my technique.

My brother in law’s souped-up Nissan GTR feels twice as fast on acceleration. But yeah, it feels that way because of its turbos. The Formula 1s gets an atmospheric engine and acceleration, although great, feels soooo linear that I didn’t get the rush I expected. I did feel the engine was producing 650hp and let me tell you: Don’t even think about flooring the gas pedal… You’ll get wheel spin and get the F**k out of the track in a split second! lol
So when you accelerate in a F1, you have no choice but to be gentle and go by 10% increments. So 10% – 20% – 30% – 40% … up to 100% and then switch gears and start again; 10% – 20% – 30% etc.
In 4th gear (of a total of 6) I went from 80% throttle to 100% because I was… well yes disappointed by its acceleration power. What happened? Guess!
Wheel spin, got the F1 sideways but as soon as I let the gas go, it came back right away. Lesson learned. It won’t give you more than that and you have to treat “her” gently.

Awesome ride, would repeat daily if I could. It’s spectacular as a formula car because its so light and powerful compared to others. But if compared with everything else out there, pure acceleration is not her best side.

Thoughts? Write ’em up below.
See ya!
Andre

Posted in A Time For Laughter | Tagged , , , , , | Leave a comment

Audi TT MK1 – Cluster replacement


Hey fellow folowers,

It’s winter time in Quebec and my TT will be stored for months. So I’m taking a few weeks to make tweaks and simple repairs in the heat of my garage.

Upgraded audio (double din radio) and cluster repair. I’ll post pics of where I am with this later in this post but I simply wish to let you know how to repair your instrument cluster.

Mine was faulty and replacing the complete instrument cluster ($2,200CAD) was not an option. Instead, I chose to simply replace the cluster for a cost of about $99.

Here’s what it looked like:

broken-cluster

In order to get there and replace my radio for a double din, I took half of the dashboard out! But refer to this video to remove the instrument cluster only.

How to remove the instrument cluster form an Audi TT – Video

img_3785 img_3786

Once removed, you need to open the cluster and desolder it.

img_3790

original-cluster-d1560tob

Make sure you order the right cluster! In the picture above, you see the original one (OEM p/n: D1560TOB) and notice how the soldering needs to be done of the left. The first cluster I ordered was the wrong one and was aligned in the center. See below.

item-171903602716

If you wish to see how it’s done, have a look at these two videos:


Now I am doing this at the same time as adding a double din radio which is the topic of another post to come. Here’s where I am.

See you!
Andre

img_3789 img_3788 img_3783 img_3787 img_3784

Posted in Audi TT MK1 | Tagged , , | 4 Comments

Flat bottom Steering Wheel with active controls… on a MK1 TT??


After installing a Flat Bottom steering wheel in my Mk1 (and comfort blinkers), my goal was to have the radio controls and Bluetooth phone and handsfree functions working directly from it.

It’s easier said than done, believe me! I searched forums and found a potential source of help… HazzyDayz. Yes them again! After all, they are specialists… So I gave them a buzz and figured out a way for them to help me. Since I’m located in Canada, I had to ship my newly installed steering wheel across the pound oh sorry, pond. J While I’m at it, the journey across the ocean cost me a few squid oh I mean quid. Sorry you had to read that.

So I shipped it to HazzyDayz and they worked on it for quite some time. They then told me they would need my radio to test it on a bench. Thank god for long Canadian winters! I didn’t mind sending it over as the TT was stored for a few months.

So time passed and I finally got them back, plus A LOT of wiring to plug everywhere. I wanted to install it myself but it was a bit over my expertise! Have a look at the pics below…

So I went to a local radio shop and they were kind enough to install it. They had to contact HazzyDayz a few times apparently, but got it to work as planned.

So I’m now a proud owner of one of the only few Mk1s with functional steering wheel controls over the OEM radio. 🙂

Speaking of OEM radio, my following post will be on how I changed all speakers & amplifier but kept the original radio in place. (Why you may ask! Simple answer: Because I want to & will pay for it lol)

Posted in Audi TT MK1 | Tagged , | 9 Comments

Is the Audi TT a chick car?


We have all heard or read comments from people saying that the TT is a “haidressers” car, much like the Mazda Miata and Volkswagen Beetle.

Now I certainly don’t think so and my opinion on this is that you should drive whatever you like and don’t care about others. But aside from the small & curvy look, what else makes it a “chick car” in people’s mind? I believe even Audi tries to market it to both men and women.

Why? Take a look at the Audi Sport TT Cup drivers. Anything different? No less than four female drivers took part in the event held in Austria. Mikaela Ahlin-Kottulinsky and Gosia Rdest as full season competitors. Rahel Frey and Doreen Seidel as special guest starters.
Doreen Seidel? Yes, she’s no less than the 2008 Playboy Germany playmate of the year! But wait, a playmate racing an Audi TT should appeal to men, no? You bet. But women too as they see a bunch of women that race TTs around the globe. This means that handle well, right? Have a look at their “girl Power” video…

What are your thoughts?


Cheers,
Andre

Posted in Audi TT Babes, Audi TT MK3, My Auti TT Race Track Pictures | Tagged , , | Leave a comment

Audi TT 8S Babes


This is the third generation of the TT! Let’s see what pictures users around the globe will post online… Keep coming back for updates!

For MK1, MK2 and videos, go to the Audi TT Babes landing page.

Enjoy!

Posted in Audi TT Babes, Audi TT MK3 | Tagged | 1 Comment

How to create your own 5 or 6-speed Open Metal Shifter


Hey guys!

Due to popular demand, here are instructions on how to make your own Audi TT 8N 5- and 6-speed Open Metal Shifter! It’s a lot of work, but you can’t go wrong with these very detailed instructions. (thanks to metal-designer in Germany for sharing his pictures along with his autocad files!)

Note to the reader: This text has been translated from German to English. Don’t hesitate to suggest modifications if needed.

final-520x245

This manual may be used only for private purposes. Commercial use of the contents of this manual without prior approval is not allowed by the site operators – please therefore contact us in advance. For substantive error in the pattern, we can not accept any liability.

In this guide we explain how you can build the Audi TT 8N shifter, step by step. We have attached this all the necessary information, such as the construction drawings of the Laser and milled parts as well as the suppliers where you can buy the necessary parts.

Tools needed
1 Glue gun
2 Allen key set for different sizes
3 Wood drill (diameter: 5mm)
4 Screwdriver (slotted and cross)
5 Cordless Screwdriver
6 Scissors
– Needle and thread to sew the switching Sacks (the same color leather)

Material needed

Bauteile1
1 Leatherette (430x175mm)
2 Stainless steel design – Shift Gate (Material 1.4301 polished 3.0mm)
3 Spacer
4 Cable ties PVC Length: 200mm
5 M4x50 cylinder head IMBUS 8pcs
6 Aluminum ball (d = 50mm polished, threaded blind 12 × 1.5 – 20mm)
7 Panel for shift stick (inner diameter: 12.5mm, length 95mm, thickness: 0.5mm)

Time to get going, let’s start the project!

Ordering the laser cut stainless steel design – Shift Gate

kulisse-audi-tt-8n-aus-edelstahl

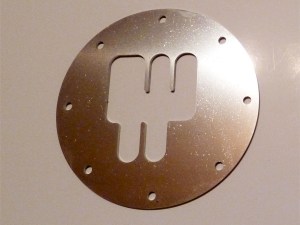
There are two possible variants: Variant 5-speed or 6-speed . We have the AutoCAD drawings for both.

DXF drawing of the 5-speed version: Download (zip file)
DXF drawing of the 6-speed version: Download (zip file)

Contact a machine shop with the following information:

Drawing: download the right dxf file above
Material: 1.4301 stainless steel
Material thickness: 3.0 mm
Length x Width: 139.7 x 139.7 mm
Quantity: 1 piece

Ordering the Spacer ring

abstandsring-audi-tt-8n

This is very similar to the stainless steel Shift Gate. You need the attached file and a supplier that will create the part for you (not necessarily a machine shop this time).

DXF drawing of spacer ring: Download (zip file)

Contact a machine shop with the following information:

Drawing: download dxf file above
Material: MDF
Thickness: 25.0 mm
length x width: 140.5 x 140.5 mm
Quantity: 1 piece

Ordering the aluminum ball (optional)

alu-schaltknauf-audi-tt-8n

Now comes our third order – optional, because you could also use the original shift knob.

For the aluminum ball, we do not need any drawing. Simply source a supplier that can get you:

Aluminium ball polished
Diameter: 50.0 mm
blind holes: 12 x 1,5 – depth: 30.0 mm
Quantity: 1 piece

Ordering the Shift Stick (optional)

schaltstockblende-audi-tt-8n

The shift stick is the short stainless steel tube that is pulled over the original shift stick. It isn’t necessary for this job, however it is recommended since it looks better.

Again, no need for specific files. Simply source:

Material: Stainless steel Pipe
Outside diameter: 13.5 mm
Inner diameter: 12.5 mm
Wall thickness: 0.5 mm
Length: 95.0 mm
Quantity: 1 piece

Preparation of the spacer ring incl. Leather trim

AbstandsringBohrungen

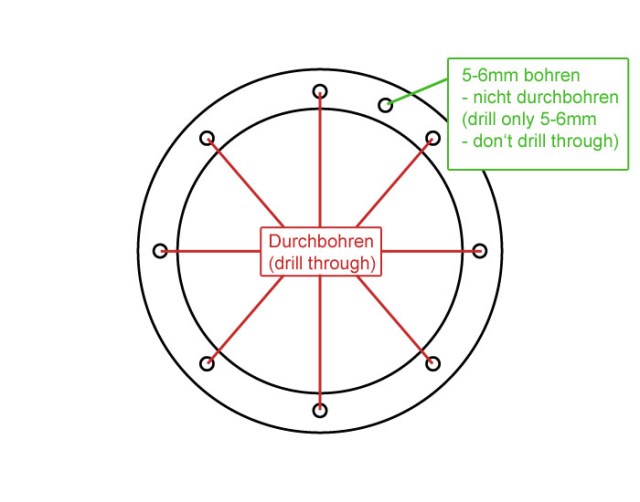
It is possible that after the production of Spacer ring, the 8 holes may not be complete (go from side to side) – if not, we must re-drill them. For this we take our cordless screwdriver and drill with a diameter of 5mm and drill the holes at the end (see picture red). We also need one extra hole using the same drill but just about 5-6 mm deep, located in the middle of two complete holes (see picture green). These will be needed later during installation, as most TT’s have a little nipple on the threaded plate. We’re done for now with the spacer ring – now comes the leather trim.

Preparation of the leather trim

Schaltsack-Zuschnitt

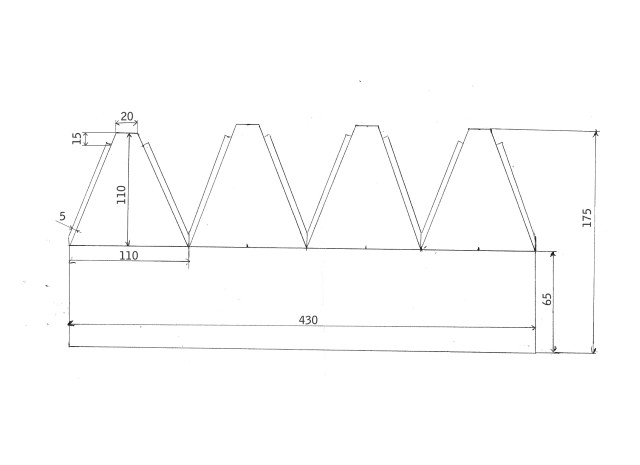
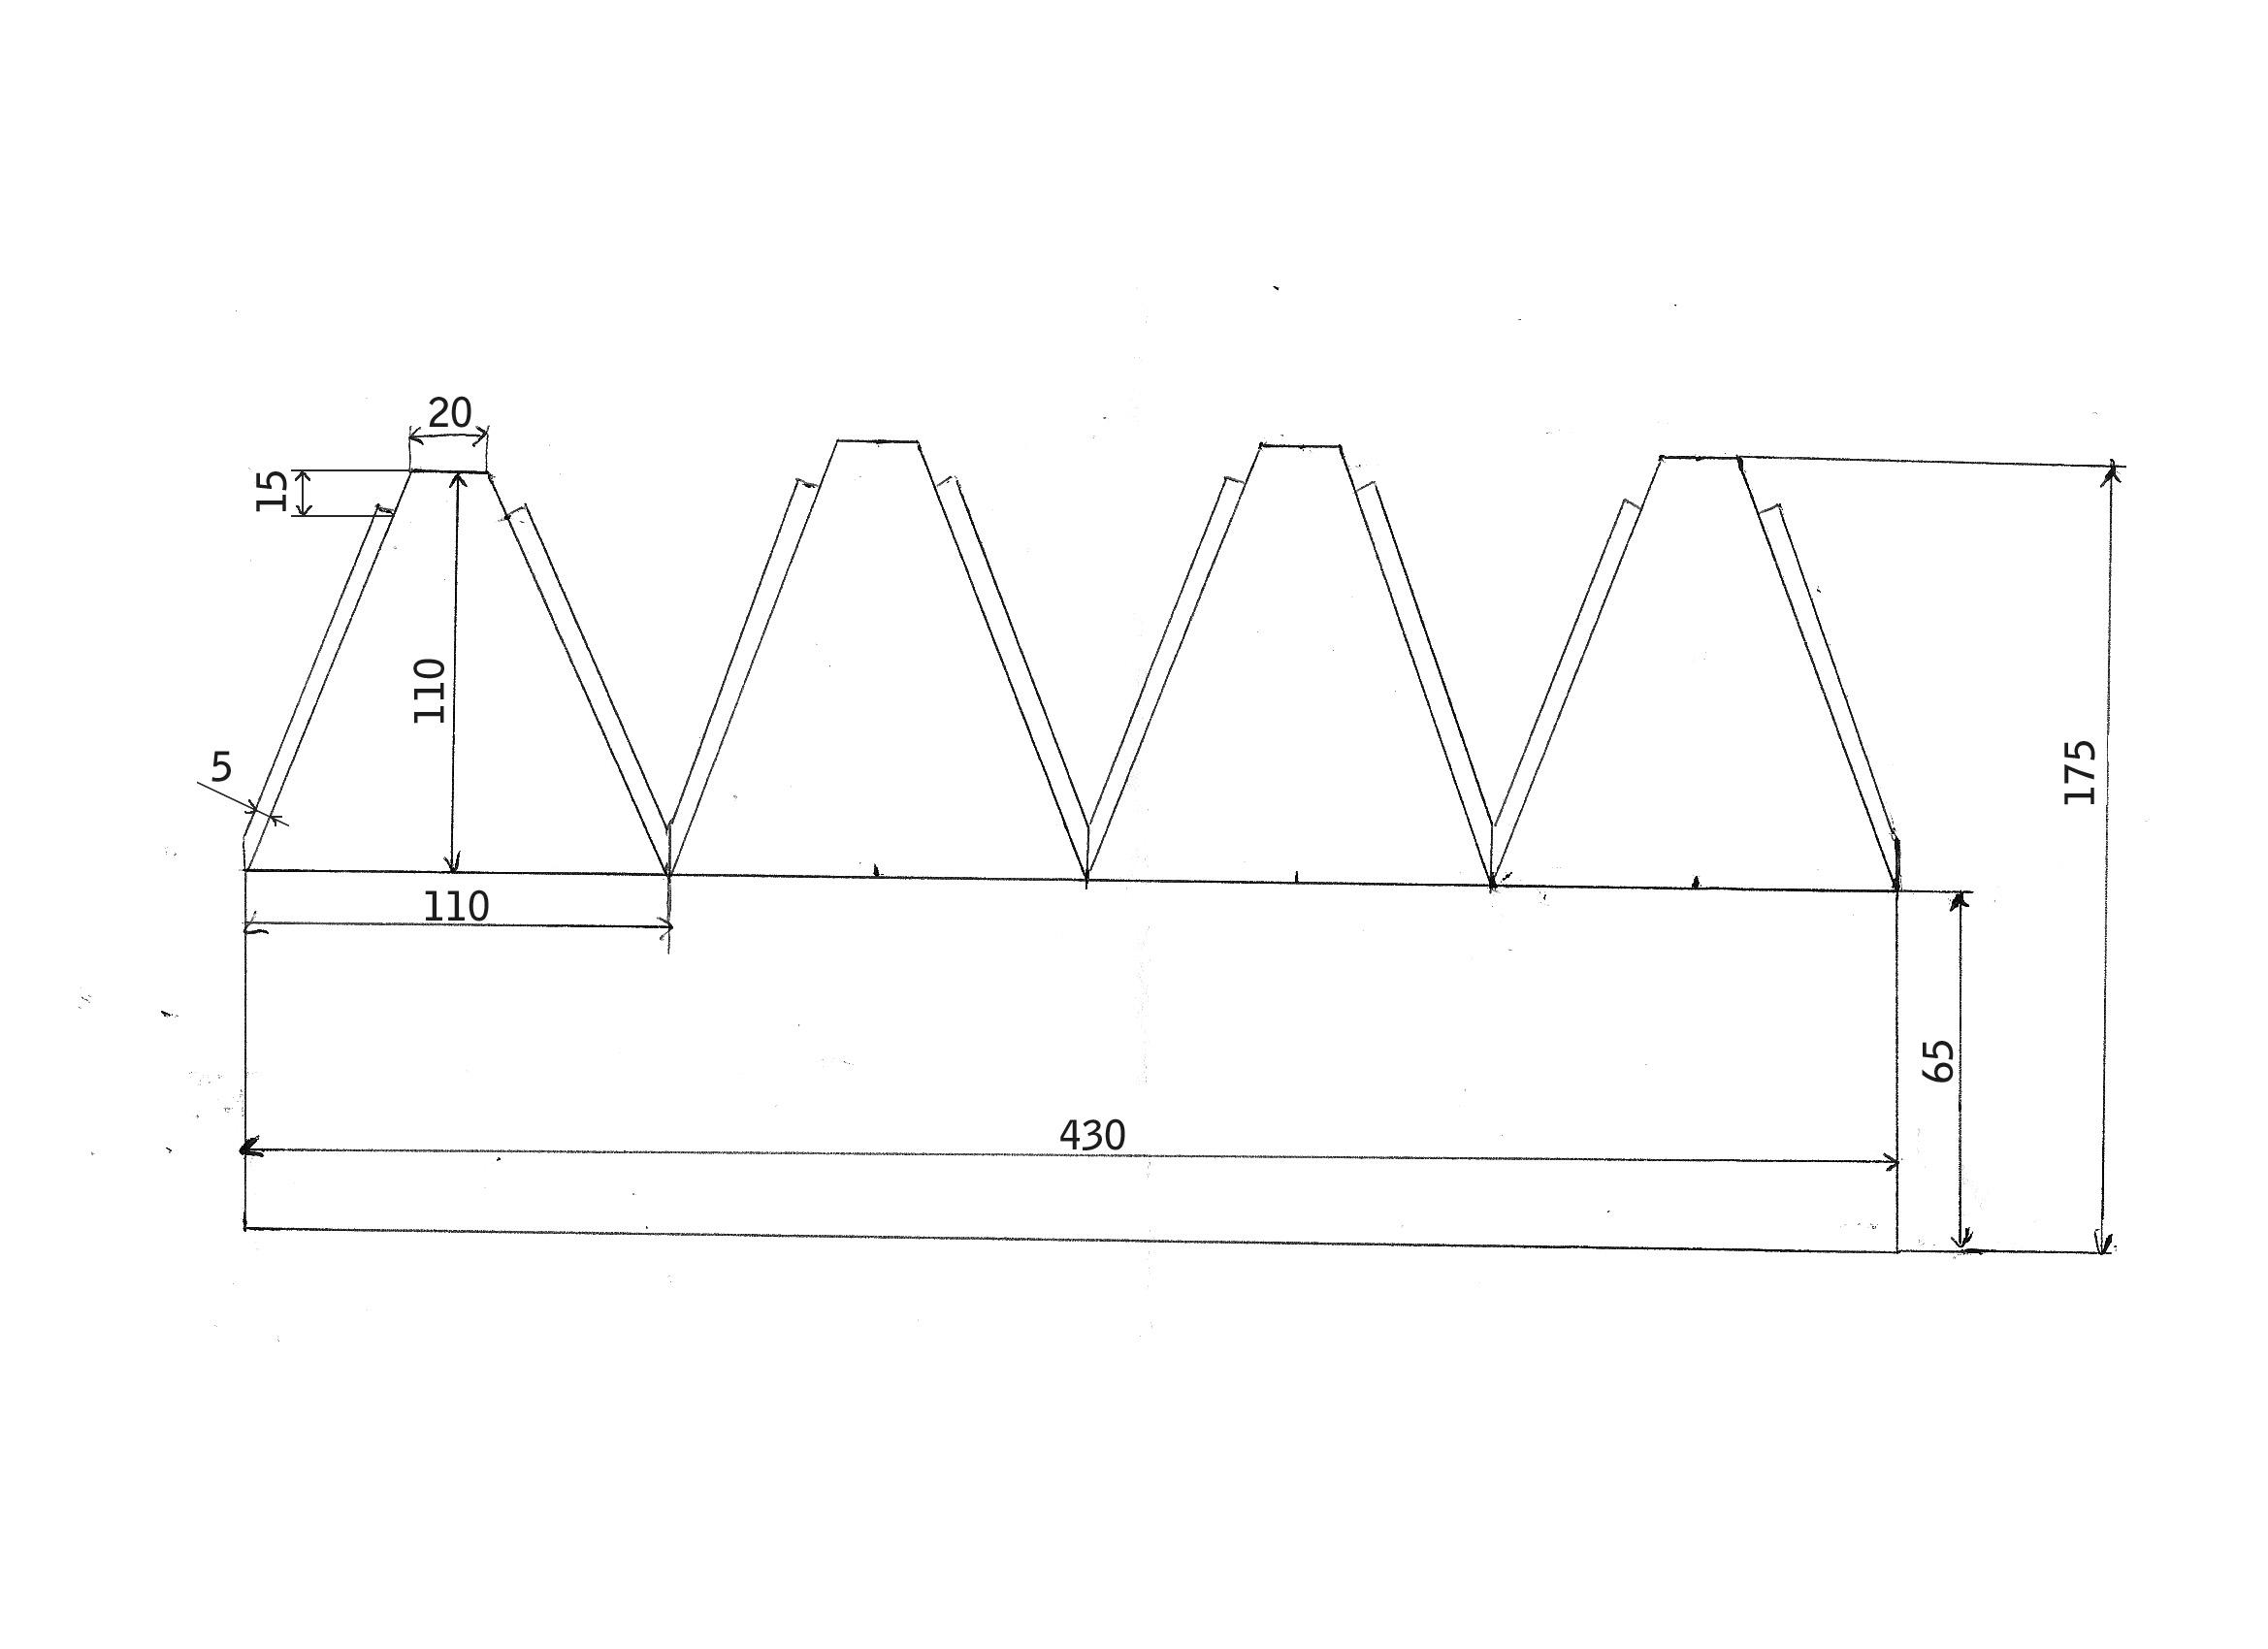
We now cut our piece of leather (leatherette) to the exact dimensions of 430 x 175 mm (please pay attention to right angle). Now we have a rectangle with the dimensions 430 x 175 mm available.

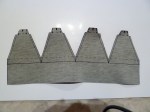
We turn this around (ie with the “leather side on the table.” So now we have the blank (the contour that we will cut later with scissors) of leather blank canvas (see image).

Draw the lines on the blank canvas for future cutting. Make sure you take your time to do it properly. Now you’re ready to cut the canvas using your scissors. For this we have attached a small photo gallery:

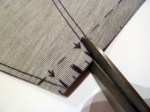
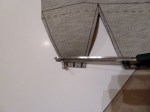
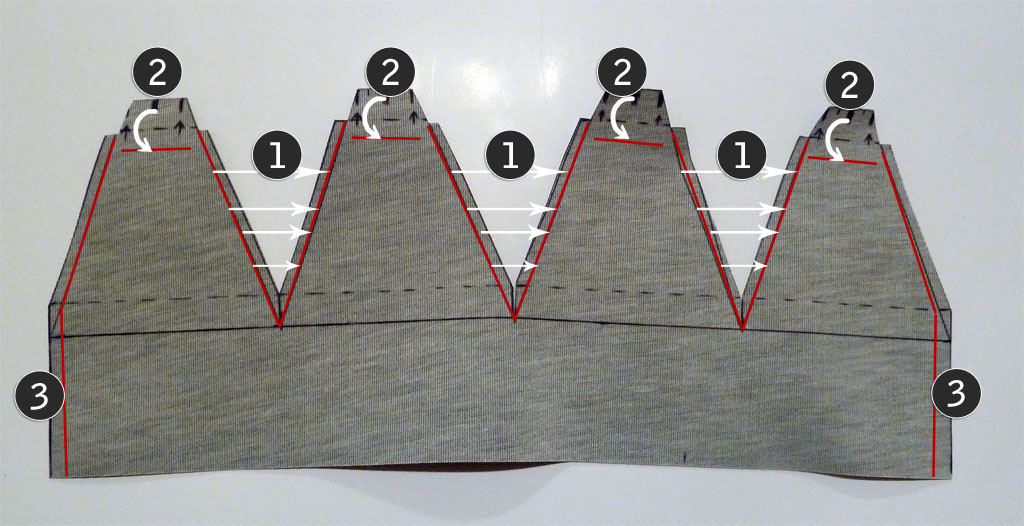
Now that we have cut the leather perfectly, we can devote ourselves to the sewing. Here we must be careful a little bit so that we sew everything in the correct order. Therefore, we have created you a small list – please adhere strictly to this order:

schaltsackNaehbild

1. The 3 oblique inner seams
2. The upper tabs
3. The outer seam

Note: We sew the shift boot to the left and then invert it at the end in order to right – thus we have on the visible side a nice seam. As with a T-shirt which is washed on the left and then turns back to the guards on the right.

Follow the pictures and sew only along the red lines shown above, then nothing can go wrong:

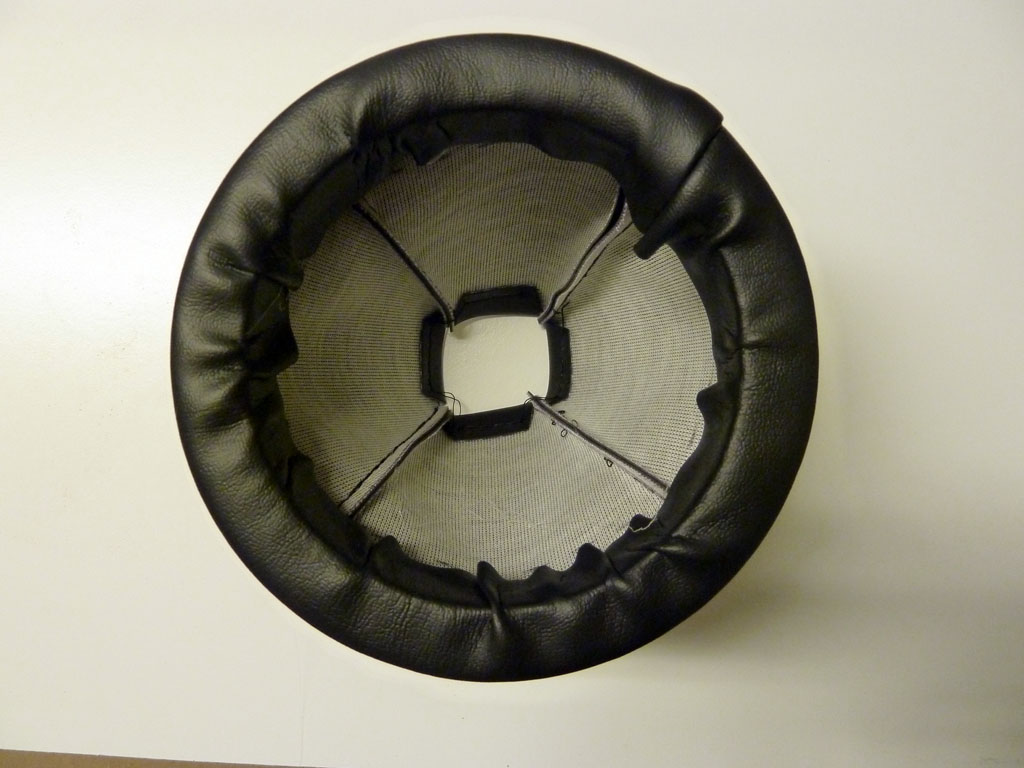
Connection of leather trim with the spacer ring

Now is the time to connect the leather trim with the spacer ring. For this purpose you need the glue gun to drop hot glue on the inside of the ring (Drop glue on just 1/4 of the ring). Immediately fold the excess leather inside the ring (see pictures below) and hold the leather inside the ring for a few seconds until the glue has solidified. (use gloves to protect your hand from hot glue)

bezugDistanzringBild03 bezugDistanzringBild04

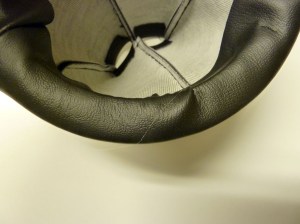
This process is repeated a total of 4 times. Thereafter, the spacer ring should be wrapped entirely in the leather.

Now revert the head of the leather trim (the narrow end) through the ring and pull the cable tie in the tabs at the top of the leather covering. This cable tie is later used to securely connect the shift boot with the shift stick. Please snap a few teeth the cable tie to ensure that there remains sufficient clearance for assembly.

bezugDistanzringBild06 bezugDistanzringBild05

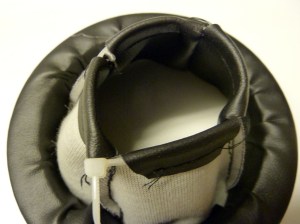
The final step for the spacer ring is to drill holes into the leather for the mounting screws. For this, use a small pin screwdriver. You have a total of 9 holes to drill. Do not forget that 8 are complete holes so that the screws can pass through the ring. The spacer ring is now completely done!

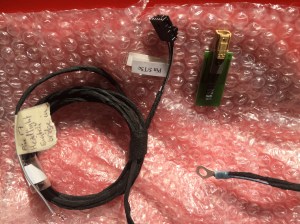
Now should you have the following parts:

final-520x245

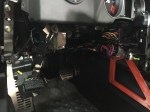
It’s very easy to install now.

Audi TT (8N) Open Metal Shifter (6 Speed ) - 010113_6

Well that completes the translation guys. Hope you try it and let me know how it went! Not an easy task but hey, it’s worth at least $200 🙂

I’d like to get your comments, so fire-up!

Andre

Posted in Audi TT MK1 | Tagged , , , , | 21 Comments