
Hey guys!
Due to popular demand, here are instructions on how to make your own Audi TT 8N 5- and 6-speed Open Metal Shifter! It’s a lot of work, but you can’t go wrong with these very detailed instructions. (thanks to metal-designer in Germany for sharing his pictures along with his autocad files!)
Note to the reader: This text has been translated from German to English. Don’t hesitate to suggest modifications if needed.

This manual may be used only for private purposes. Commercial use of the contents of this manual without prior approval is not allowed by the site operators – please therefore contact us in advance. For substantive error in the pattern, we can not accept any liability.
In this guide we explain how you can build the Audi TT 8N shifter, step by step. We have attached this all the necessary information, such as the construction drawings of the Laser and milled parts as well as the suppliers where you can buy the necessary parts.
Tools needed
1 Glue gun
2 Allen key set for different sizes
3 Wood drill (diameter: 5mm)
4 Screwdriver (slotted and cross)
5 Cordless Screwdriver
6 Scissors
– Needle and thread to sew the switching Sacks (the same color leather)
Material needed

1 Leatherette (430x175mm)
2 Stainless steel design – Shift Gate (Material 1.4301 polished 3.0mm)
3 Spacer
4 Cable ties PVC Length: 200mm
5 M4x50 cylinder head IMBUS 8pcs
6 Aluminum ball (d = 50mm polished, threaded blind 12 × 1.5 – 20mm)
7 Panel for shift stick (inner diameter: 12.5mm, length 95mm, thickness: 0.5mm)
Time to get going, let’s start the project!
Ordering the laser cut stainless steel design – Shift Gate

There are two possible variants: Variant 5-speed or 6-speed . We have the AutoCAD drawings for both.
DXF drawing of the 5-speed version: Download (zip file)
DXF drawing of the 6-speed version: Download (zip file)
Contact a machine shop with the following information:
Drawing: download the right dxf file above
Material: 1.4301 stainless steel
Material thickness: 3.0 mm
Length x Width: 139.7 x 139.7 mm
Quantity: 1 piece
Ordering the Spacer ring

This is very similar to the stainless steel Shift Gate. You need the attached file and a supplier that will create the part for you (not necessarily a machine shop this time).
DXF drawing of spacer ring: Download (zip file)
Contact a machine shop with the following information:
Drawing: download dxf file above
Material: MDF
Thickness: 25.0 mm
length x width: 140.5 x 140.5 mm
Quantity: 1 piece
Ordering the aluminum ball (optional)

Now comes our third order – optional, because you could also use the original shift knob.
For the aluminum ball, we do not need any drawing. Simply source a supplier that can get you:
Aluminium ball polished
Diameter: 50.0 mm
blind holes: 12 x 1,5 – depth: 30.0 mm
Quantity: 1 piece
Ordering the Shift Stick (optional)

The shift stick is the short stainless steel tube that is pulled over the original shift stick. It isn’t necessary for this job, however it is recommended since it looks better.
Again, no need for specific files. Simply source:
Material: Stainless steel Pipe
Outside diameter: 13.5 mm
Inner diameter: 12.5 mm
Wall thickness: 0.5 mm
Length: 95.0 mm
Quantity: 1 piece
Preparation of the spacer ring incl. Leather trim

It is possible that after the production of Spacer ring, the 8 holes may not be complete (go from side to side) – if not, we must re-drill them. For this we take our cordless screwdriver and drill with a diameter of 5mm and drill the holes at the end (see picture red). We also need one extra hole using the same drill but just about 5-6 mm deep, located in the middle of two complete holes (see picture green). These will be needed later during installation, as most TT’s have a little nipple on the threaded plate. We’re done for now with the spacer ring – now comes the leather trim.
Preparation of the leather trim
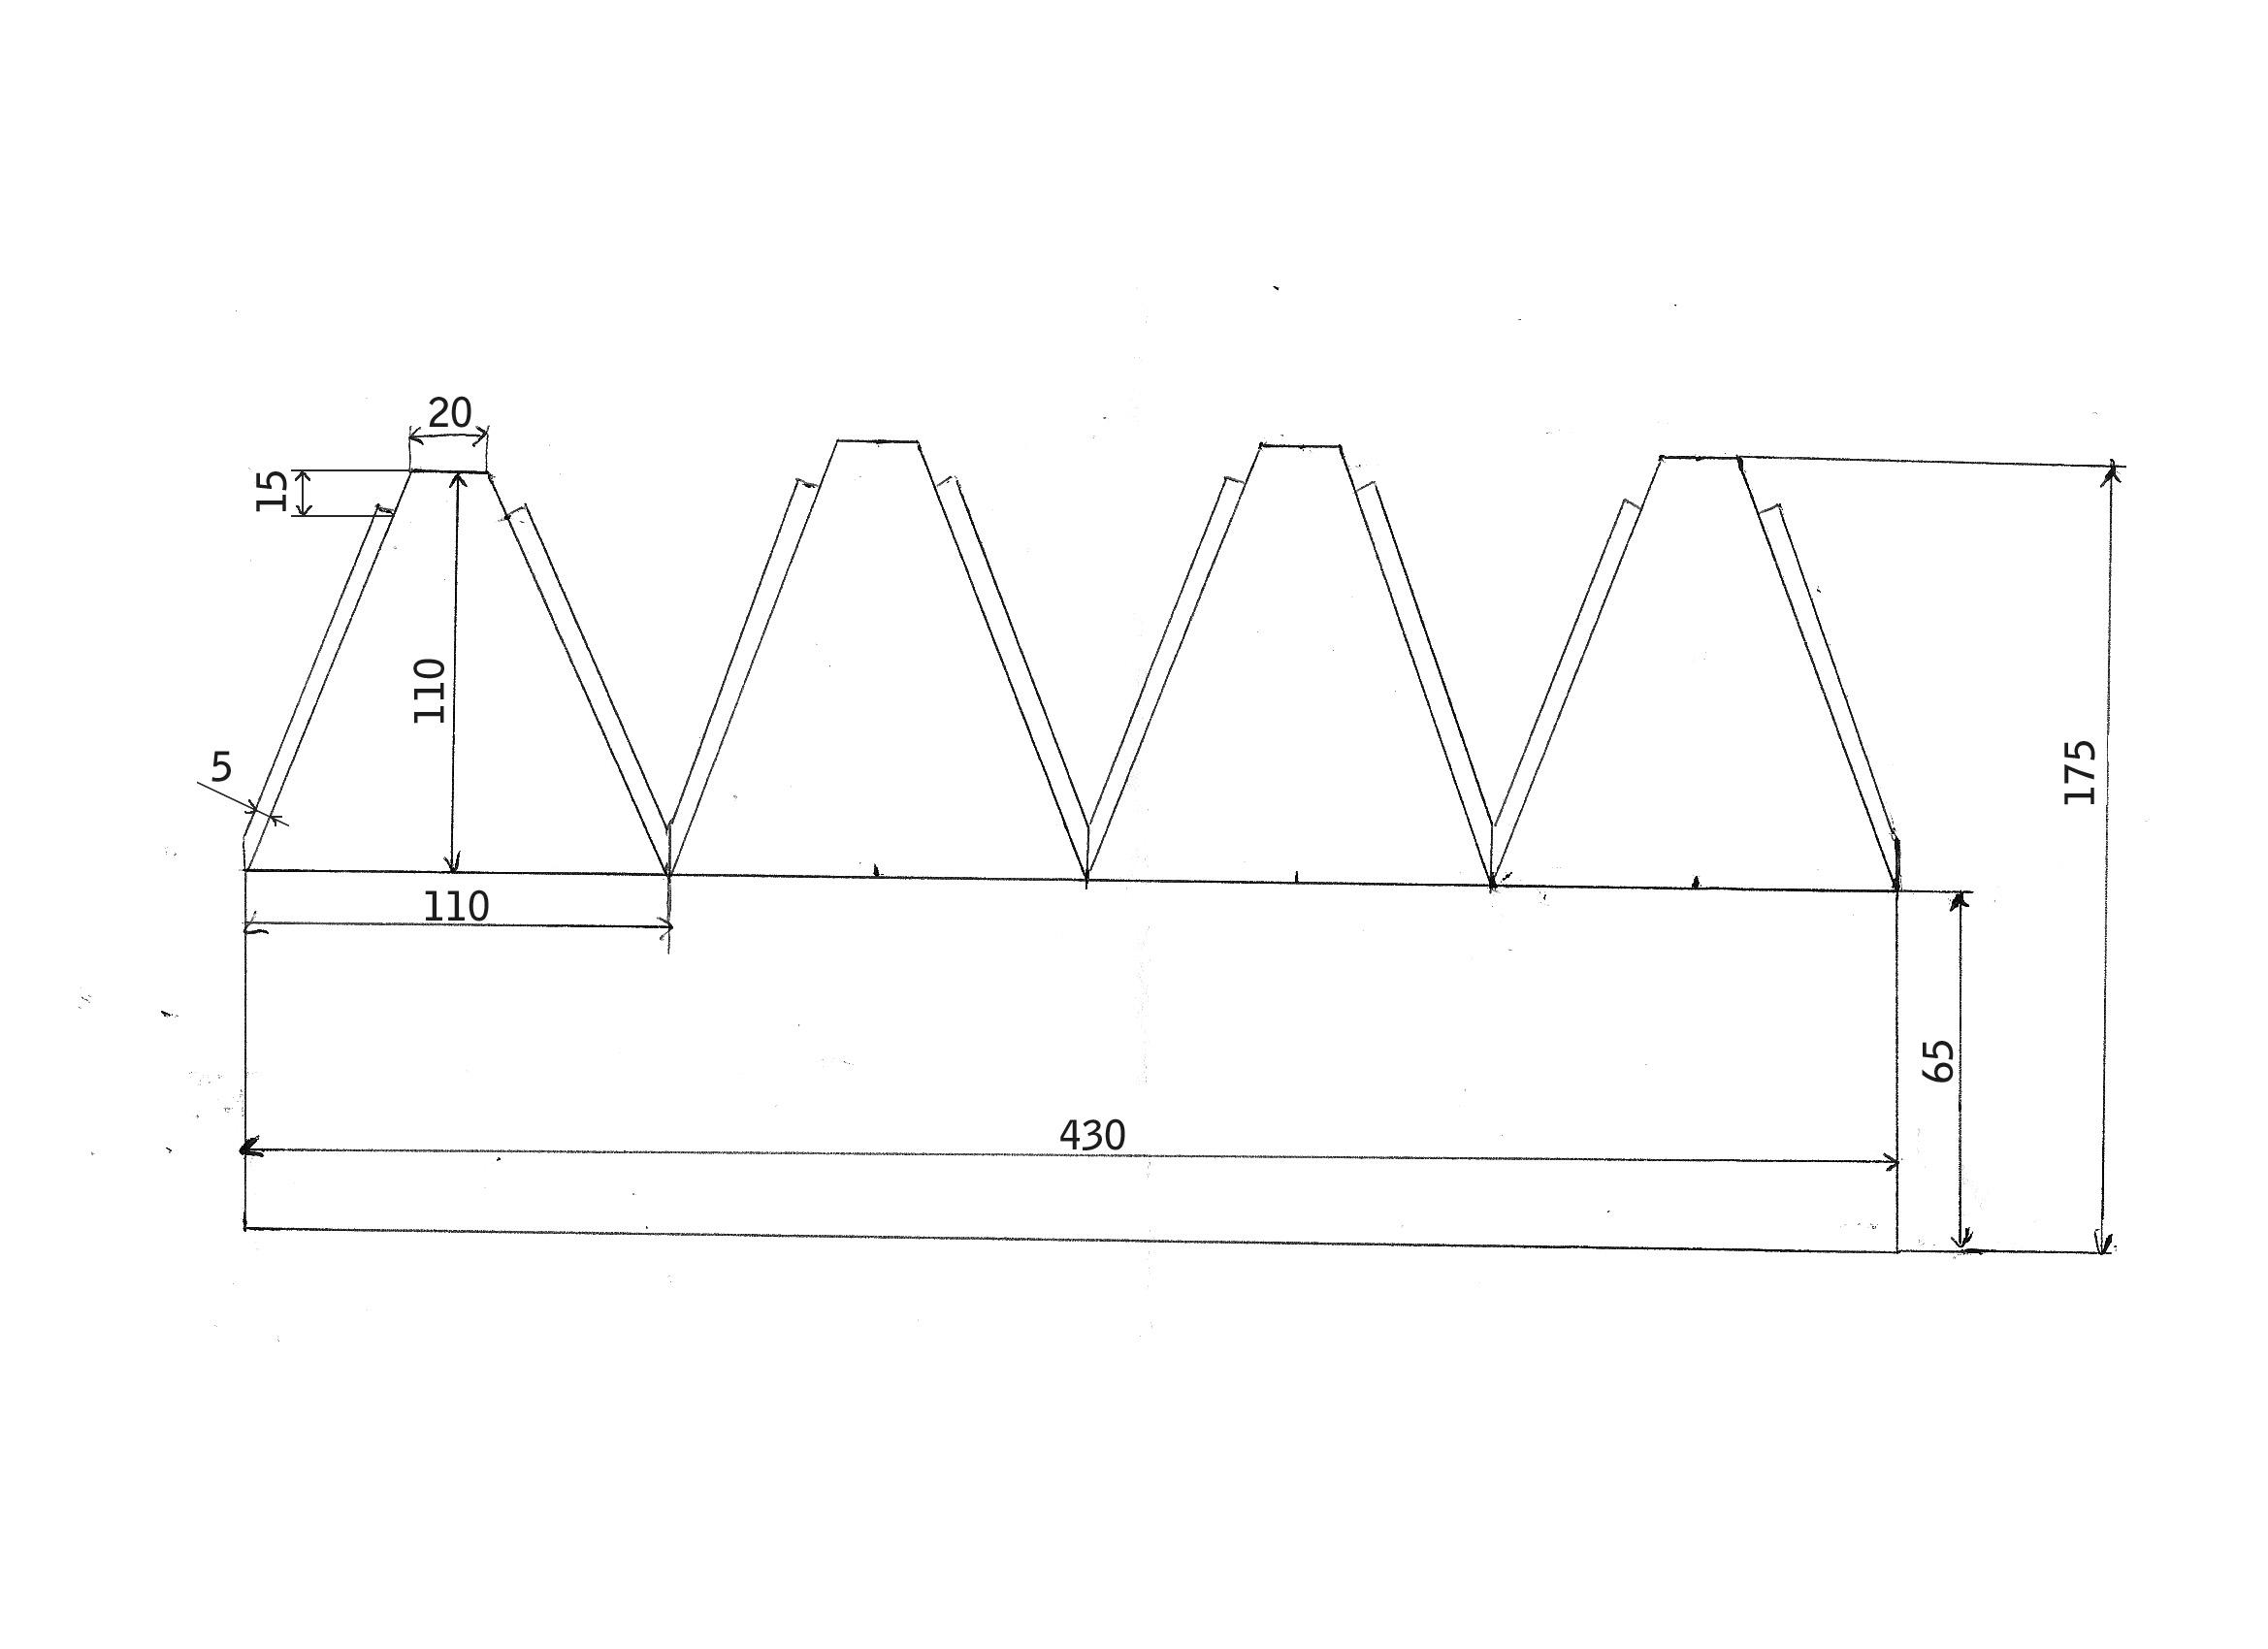
We now cut our piece of leather (leatherette) to the exact dimensions of 430 x 175 mm (please pay attention to right angle). Now we have a rectangle with the dimensions 430 x 175 mm available.
We turn this around (ie with the “leather side on the table.” So now we have the blank (the contour that we will cut later with scissors) of leather blank canvas (see image).
Draw the lines on the blank canvas for future cutting. Make sure you take your time to do it properly. Now you’re ready to cut the canvas using your scissors. For this we have attached a small photo gallery:
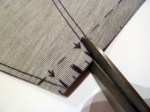

Now that we have cut the leather perfectly, we can devote ourselves to the sewing. Here we must be careful a little bit so that we sew everything in the correct order. Therefore, we have created you a small list – please adhere strictly to this order:
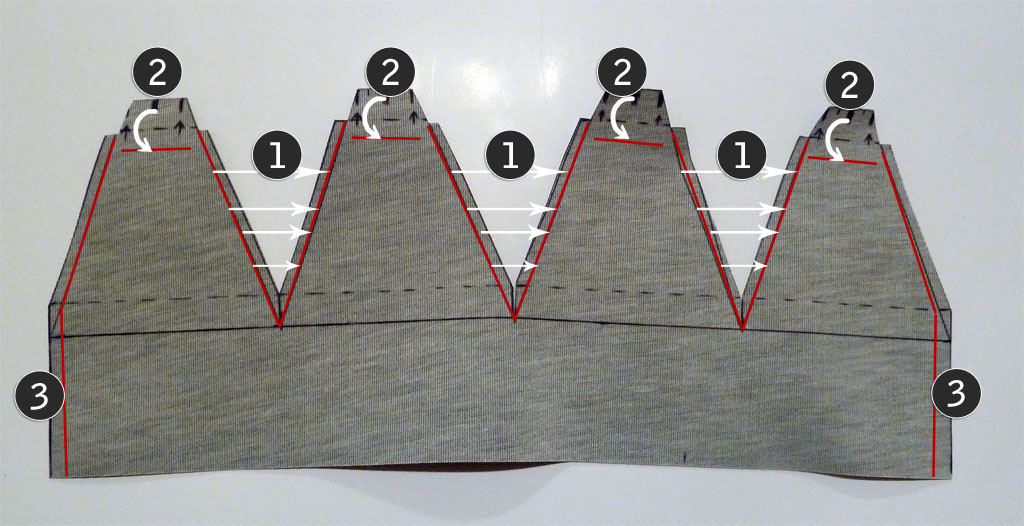
1. The 3 oblique inner seams
2. The upper tabs
3. The outer seam
Note: We sew the shift boot to the left and then invert it at the end in order to right – thus we have on the visible side a nice seam. As with a T-shirt which is washed on the left and then turns back to the guards on the right.
Follow the pictures and sew only along the red lines shown above, then nothing can go wrong:


Connection of leather trim with the spacer ring
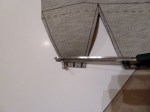
Now is the time to connect the leather trim with the spacer ring. For this purpose you need the glue gun to drop hot glue on the inside of the ring (Drop glue on just 1/4 of the ring). Immediately fold the excess leather inside the ring (see pictures below) and hold the leather inside the ring for a few seconds until the glue has solidified. (use gloves to protect your hand from hot glue)


This process is repeated a total of 4 times. Thereafter, the spacer ring should be wrapped entirely in the leather.
Now revert the head of the leather trim (the narrow end) through the ring and pull the cable tie in the tabs at the top of the leather covering. This cable tie is later used to securely connect the shift boot with the shift stick. Please snap a few teeth the cable tie to ensure that there remains sufficient clearance for assembly.

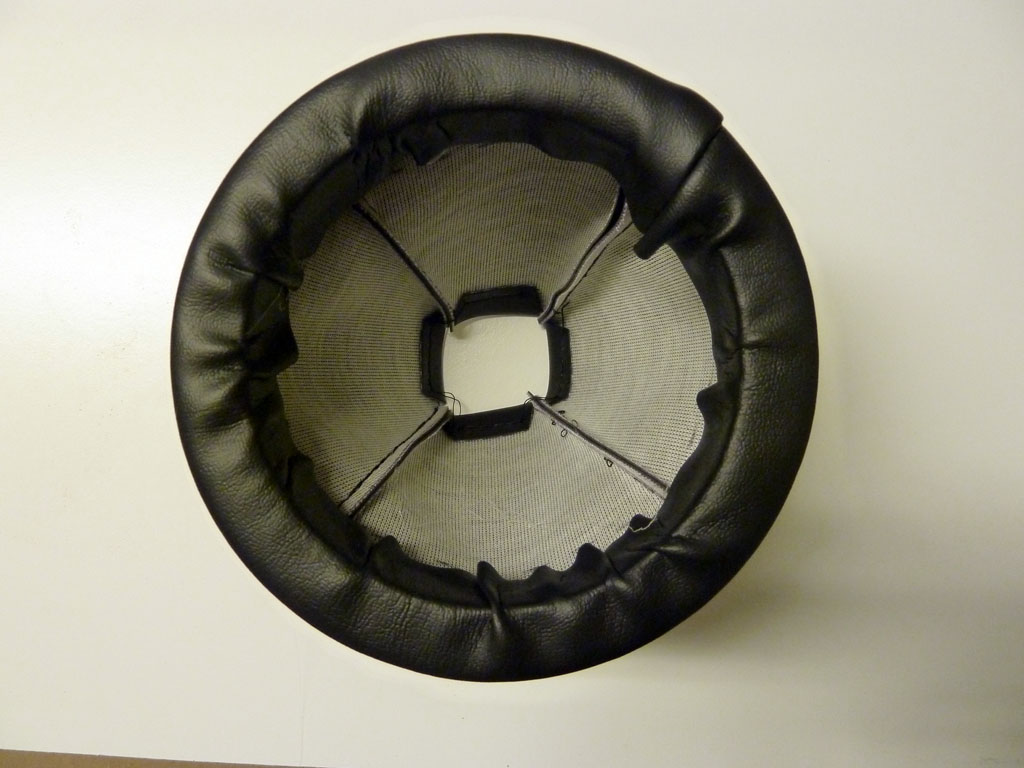
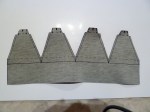
The final step for the spacer ring is to drill holes into the leather for the mounting screws. For this, use a small pin screwdriver. You have a total of 9 holes to drill. Do not forget that 8 are complete holes so that the screws can pass through the ring. The spacer ring is now completely done!
Now should you have the following parts:
It’s very easy to install now.

Well that completes the translation guys. Hope you try it and let me know how it went! Not an easy task but hey, it’s worth at least $200 🙂
I’d like to get your comments, so fire-up!
Andre

Thank you for the post. Impressive! I may need to build one(hopefully) soon, but for a different reason. I am looking into putting a 6 speed from a ’99-2005 Mk 4 GTIt, VW Beetle Turbo S EER, Mk4 VW Jetta GLI/GTI 20th or 337/02M into my Mk 1 fwd TT painlessly(bolts right up). I have an AWP block, & am hoping VAG at some point used the same block as my Audi. For the VW swap folks it’s suggested to use TT half-shafts & hubs. So that part works for me. Don’t know where Audi cut the platform, but seems unlikely shift lever forward. Suspect the VW linkage/shift cables might work; if not, maybe the TT set-up will work out. How to find trans to my block compatibility is the issue. Anywhere you’d suggest I go? Do you have an index of your “how-to photo” packs, and who does what ( mirror led, headlight angels, and other”out there” modifications? You have several (packs?) that I want to buy. Don’t know which type to order (they vary by #’s of photos).Don’t care to look at the box & such, just the “get ‘er done” stuff. What # of pack(s) does that pertain to? Any morsel of help will be appreciated. [request a “finder’s fee” if you so choose] Thank you, George Kates
________________________________________
Interesting post! Is the final picture a 5-speed or a 6-speed?
I had a 5-speed box in a Mini Cooper S decades ago with a similar metal shift gate (similar to those in older Ferraris) but the stick buzzed incessantly against the gate. Does your design have a similar problem?
Hi Kerry,
Depends which picture you’re referring to. The last one is a 6 speed.
I have never heard anyone complain about vibration noise. I see what you refer to but just never had anyone tell me if it exists on Mk1s.
Andre
Very nice thank you very much andre i will most likely be doing this for my TT (: i saw your TT on youtube and i would like to ask you a question if posible about your car? 😀 thanks you
-oscar
Sure Oscar, I’m listening 🙂
whats the length of screws?M4x50
Hey Matt,
I do not know… they look like thay are around one inch long. Let me know if you figure it out.
Andre
whats the length of M4x50 cylinder head screws?
Hello! I’m trying to have the shifter panel made on 3mm steel, laser cut. My concerns is the measurements of its dxf file are different from the measurements of the spacer ring. The spacer ring outside diameter is 140.5mm while the shifter panel in the dxf is 139.5… un millimeter smaller.
Is it right or wrong? I’m using the 6 speed version… please advice asap!
Sorry for the delay! Have you tried it at 139.5? Let me know what you did 🙂
In the end I had to let go as I fitted a short-shifter and the panel wouldn’t work anyway :-p
Darn. How does it feel with the short-shifter? Better I assume!
Yeah, definitely a great upgrade. The gear change is now much faster and easier. I loved the feel of the lever but it was too slow for me. Worth the money, if you ask me.
Bonjour
Votre tuto est vraiment bien mais serait-il possible d’avoir les schémas pour la plaque d’acier sous un autre format car il est illisible de mon cote? d’avance merci.
Laurent
Non malheureusement pas. Mais une entreprise spécialisée dans la coupe de métal saura vous aider.
Hi do you still have the 6 speed cad drawing?
Yes it’s here:
Search for: “DXF drawing of the 6-speed” on this page :
https://wordpress.com/read/blogs/16923136/posts/2756
hello ! i need to create one for a 2012 vw golf sportwagon with 5 speed . can i use the same model ?
Yes!
Do you still have the auto cad drawing for 6 speed?
Yep on this page: https://wordpress.com/read/blogs/16923136/posts/2756