Guys,
More pics as I continue working on the car. Defcon bushings, HPA Haldex controller, Wideband air-fuel and temperature gauges are installed.
Andre


Guys,
More pics as I continue working on the car. Defcon bushings, HPA Haldex controller, Wideband air-fuel and temperature gauges are installed.
Andre
Hi guys,
This is part one of many, where I will bring you pictures of the “making of” my MK1 TT RS / GT3 RS. It’s very exiting, since I should be completely done for the first track day of the season, on May 11.
Today, wheel paint and HPA’s Hadlex Performance Controller.


A light snow fell on our roads early this morning. As I was driving to work, around 5.30 am, I knew this wasn’t going to be a good day. We were told by the weather people that the snow would melt later in the day, but still, I had to drive to work with my summer wheels on the car…
And summer wheels equals’ summer tires… And summer tires on snow equals no hard breaking.
So I had the radio on, listening to the April 1st radio pranks. I was actually laughing my head off when I saw a road jam about 500 meters ahead… It seemed like some had hit each other, forming this huge impenetrable, metal road block in front of me. I stepped gently on the brakes as I was coming rapidly onto the stationary cars. And that’s where it ended for me.
There was nothing I could do! Stepping on the brakes, even just a little, made the TT glide towards the point of no return. Even the steering wheel didn’t respond to my commands. The summer tires were no help at all…
As I was trying different brake-gas-steering combinations, the TT was still gliding… towards this very stopped white van now 100 meters in front of me.
I tried everything to steer away, with no luck. My only option would have been an ejection seat, if I had one.
BANG!
How else can I describe it? Here’s a picture.

Oh yes, I should also tell you that today is April first and that this is not a true story! 🙂 Some may have noticed that this is an MK2…
Hi Guys,
Here’s a quick note to let you know I’m pretty much excited! I am now closer than ever to my goal. The TT is at the garage for now. I’m having a few things done over the end of the week:
a) Final gauge installation: I had done the install and electrical part over the winter, now the sesors are being installed. (Water and Wideband)
b) HPA Haldex controller install
c) Turbo blanket install
d) Defcon bushings install
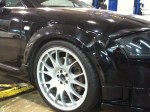
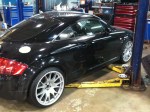
e) Wheel test (19X8 front and 19X10 rear)
f) Wheels, Rear wing and mirrors being paint orange for that Porsche GT3 black-orange look.
Next post should be pictures… 🙂
Here are the wheel install pics I got from the garage yesterday.

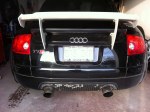
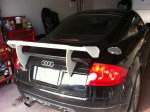
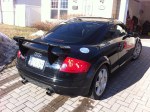
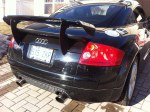
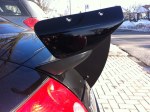
Hi Guys,
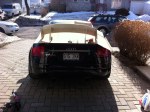
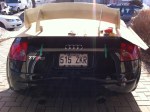
I though I’d share a few pics on the DMC Concept rear wing install. Pretty easy, it took me 45 minutes to install. I almost found it was too easy… 🙂
The TT RS is slownly coming to life! 🙂
Cheers,
Andre
Installation
Back home from the paint shop


Hi guys,
I phoned HPA yesterday, to order myself one of those Haldex controllers. 🙂
While I had Keir on the phone, I asked him if he had any thoughts on my 3.2 overheating on low-speed-hard-on-the-brakes racetracks. (such as Mécaglisse, here in Québec)
He referred to one of his clients, with a 500whp+ TT that had similar issues on race tracks. This client is known on the web as: ZillaMoto. I’m far lower at 360whp, but still these tracks are hard on the 3.2 engine. ZillaMoto had to install a huge scoop on the hood… Definitively a no-no for me. Too big, too Japanese. You get it.

zillamoto audi tt
Engine Compartment Temps
Searching the web, I came across a very interesting article that shows a way to get 20% decrease on ambient engine compartment air temperature… at no cost! Simple but effective: The OEM engine compartment trim (see picture below) seals the hood and firewall completely, keeping fresh air from coming in. When removed, it allows venting into the engine compartment at the low pressure area at the base of the Windshield. Steve from Modshack sells a “low trim” piece to replace the original. I will simply remove mine on track days.

Remove the trim and get your ambient engine air decreased by 20%
Hi guys,
You may remember a recent post on DMC Concept’s ambition to build an Audi TT MK1 Wide Body Kit. Well it seems DMC now needs your help to choose which of the two versions they will build.
The poll below will determine which Wide Body Kit will be bluilt by DMC! Your choice has to take in consideration which should sell better!
In my opinion, option A is the best, since it stays close to the original MK1 look.
There are 2 choices and their drawings are below.

A - OEM RS4 Type Front Bumper with Original Grill

B - Custom Type Front Bumper with Single Frame Grill
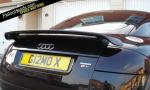
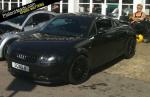
Hi Guys,
A fellow TT enthusiast is selling his amazing 462 Bhp TT!
Unfortunately for some of us, this TT is a UK car. Too far to import!
At 12,000 British pounds, this car is well worth the cost. We all know this.
So here’s the original post, from sam@mk1tt.com.

Just a update for anyone interested, here is a full list of car details , prob still missed something ![]() I would also like to mention that the TTOC and TTF have again shown there true colours by deleting any links to advert or mention of car being for sale
I would also like to mention that the TTOC and TTF have again shown there true colours by deleting any links to advert or mention of car being for sale ![]() Any way the
Any way the
car will be broken down to sell mods if not sold complete.
Well after almost 6 years of ownership my AUDI TT has to be sold 😦 I am a true enthusiast and have my own TT site mk1tt.com this is one of the most powerful mk1 TT’s in the country right now 🙂 , this car has been prepared by the guys at Jabbasport. Complete engine rebuild 3000 miles ago !
if you looking to get even more power :£ then fit a set of cams and a larger compressor wheel and it would break into the 500 bhp mark 🙂
80k on clock, 2002 raven black s-line No claims , no outstanding finance
12 months mot, 4 months tax
current reg is g12mox but this will be taken off !
2 x original keys and I believe I have the wallet key also, history for car before I when on a mod frenzy 😕 but all bills are on file at both Jabbasport and TT Shop. the car is currently at the TT Shop for storage and possible breaking if I don’t sell complete, at £12,000 this is less than I have spent on engine a turbo kit in the last 18 months 😕
Mods done to my car are as follows :
APR inlet Manifold and S4 throttle body Pro-alloy Intercooler + hard pipe setup.
Jabbasport sport 2L conversion
BAM block, AGU large port head ported and flowed by jabbasport Full
super tech valve, spring and retainer setup (ok for cams), new cam followers fitted also as old ones showed age.
Eurospec billet long nose 92.8mm stroke crank, scat rods, JE pistons
jabbasport spec, all new parts fitted bearings ,pumps etc Baffled sump
by Jabbasport Clutch is Sachs sintered paddel clutch with fully balanced fly wheel ( no chatter), gear box was serviced and new clutch cylinder replaced.
handling setup
Bilstein PSS9 setup by TT Shop
H&R Arbs 21mm 25mm setup
Full Poly bush setup un front end
Recent engine mounts fitted
Forge tie bars
Blue haldex controller
Turbo kit
Jabbasport Owens turbo setup
Owens garrett GT30 hybrid with Wrc cartridge(£400) upgrade Jabba 3inch down pipe and exhaust manifold Jabbasport oil /water lines Genesis 550 cc injectors and Bosch inline fuel pump Jabbasport intake pipe Jabba sports cat, blue flame exhaust 3bar boost sensor Jabba mapped at 462hp
Forge dv, full silicon water pipe setup .
Brake setup
Tarox b34 billet callipers and two piece discs, new pads 2 months ago
and have a second set of track ones which are to noisy for road use ![]()
Standard rear setup, new discs and pads 4k ago Good ridge brake lines
in blue New master cylinder 4k ago
Service at Jabba 3 weeks ago
3 new coil pack
New flow meter
New crank position sensor
New plugs
New pollen filter
Air filter cleaned oiled and baked.
Cam timing checked .
Interior is standard , fitted with bose and cd Black leather heated
External mods
Colour coded head lights and Osir insets and quad angel eyes by WAS
cupraR splitter , tinted rear lights Rieger r-frame rear spoiler
colour coded to car Aero wipers fitted, three bar grille Wheels are Oz
super T’s in black 18 inch with eagle f1 assimatric new type.
Recent work cv boots, new pads (i have a second set of track pads
also)
Hi guys,
Since many of you ordered the LED DRLs, I have often been asked for complete instructions on how to remove the front headlights and how to break them apart.
So in this post, you will find 3 instruction guides.
a) Wak’s Eclipse Lights & Clear/Smoke Corner Fitting – (Step by Step Instructions with Images)
b) Jeff Bipes’ Angel Eyes fitment guide (Step by Step IMAGES ONLY)
c) Bentley’s Repair Manual Headlight Removing Guide
I am 100% sure you will be able to do it, following these guides. The process is quite long for the DIY guy that is at his first try. I would use Wak’s guide as the primary guide and use the two other ones if questions occur.
Since the two first removal guides are links, you will find Bentley’s guide below. Here it goes:
1. Remove the Front Wheelhousing Liner
2. Remove the Front Bumper
3. Removing headlights
4. Adjusthing the headlights
1. Remove the Front Wheelhousing Liner
 1 – Front wheelhousing liner
a) Remove front wheel before removing wheelhousing liner
b) Unscrew Torx bolts -2- (13x).
c) Disengage wheelhousing liner from fender and pull it out downward.
2 – Torx bolt (T25) at 1.5 Nm
3 – Wing
4 – Expanding clips (7x)
5 – Seal
Self-adhesive, glued onto wheelhousing liner
6 – Fender brace
2. Remove the Front Bumper
Front bumper, removing, installing and assembly overview

1 – Trim
Removing:
Open engine hood.
Detach front part of wheel housing liner
Remove screws -3- and take off securing strip -2-.
Remove screws -14- and -16-, then detach wheel spoiler -15-.
Release quick-release fasteners on wheel housing liners and noise insulation (FIG2)
Remove screws -17- at bottom of trim from noise insulation.
Unscrew nuts -11- from inner side of wheel housing.
Loosen screws -10- and press guide profile -12- slightly downward.
CAUTION!
If guide profile is not loosened, trim cannot disengage from retainers, and paintwork may be damaged. Detach hose at connecting piece on vehicles with headlight washers. Detach trim toward the front.
2 – Securing strip
3 – Combi screw: 6 Nm
4 – Combi bolt: 35 Nm
5 – Securing nut: Hold nut with open-ended spanner when tightening combi bolt -4-
6 – Cross-head bolt:
For pre-assembly
Unscrew when removing bracket -8-
7 – Hexagon bolt: 35 Nm
8 – Bracket
Trim -1- and bumper -5- removed
To remove, unscrew bolts -7- and pull bracket out of longitudinal member
9 – Bumper
Trim -1- removed
To remove, unscrew combi bolt -4- and detach bumper
Note: Clips must be pressed into fender before installing bumper (FIG1)
10 – Screws: 1.5 Nm
Before detaching trim -1-, loosen screws so that retainers on guide profile -13- disengage from trim.
11 – Hexagon nut with collar: 6 Nm
Only accessible after removal of wheel housing liner
12 – Guide profile
Trim -1- engages in side of guide profile
To enable trim -1- to engage upon installation, press guide profile upward as far as it will go and tighten screws -10-.
13 – Expanding clip
Expanding clips must be pressed into fender before installing trim -1- (FIG1)
14 – Self-tapping screw: 1.5 Nm
15 – Wheel spoiler
Detach before removing trim -1-
16 – Self-tapping screw: 1.5 Nm
17 – Combi bolt: 2.5 Nm

FIG 1 & 2
Fig. 1 Pressing in expanding clips
Before installing trim -4-, it is necessary to press clips -2- into fender -3-.
Tighten hexagon collar nut -1- to 6 Nm.
Fig. 2 Detaching wheel spoiler
Unscrew Torx screws -arrow A- and 2 screws from underside.
To detach wheel housing liner, release quick-release fasteners -arrow B-.
3. Removing headlights
 Disconnect battery
Remove front bumper trim
Remove screws -arrows-.
Slide headlight towards radiator in order to disengage mounting pin -1- from retainer -2-.
Disconnect electrical connections.
Remove headlight housing from opening.
Installing. Install in reverse order of removal, noting the following:
Connect electrical connections.
Engage mounting pin -1- in retainer -2-.
Install screws -arrows- and hand-tighten only.
Install front bumper trim
Check headlight housing alignment with bumper trim. If alignment is necessary, proceed as follows:
Loosen screw -3-.
Turn adjuster -2- as necessary to bring headlight housing in alignment with bumper trim.
Tighten all screws -arrows-.
Reconnect battery
Check/adjust headlights after installing
Tightening torque: Headlight housing to lock carrier: 6.5 Nm
4. Adjusthing the headlights
Halogen headlights, adjusting
Special tools, testers and auxiliary items needed : VAS 5107 Optical headlight aimer
 Adjustment screws on left headlight shown. Arrangement on right headlight is mirror image.
1 – Not applicable
2 – Height adjustment screw
3 – Lateral adjustment screw
Turn adjustment screws to achieve specification
Hi Guys,
I shot a few videos of my LED DRLs last night and this morning. Yesterday night’s videos came out not to good so I took more today during daytime. I have been asked many time to shoot videos, so here they are! Unfortunately, the picture quality is not the best, but hey, it’s still HD!
On the videos below, you’ll see: LED DRLs (available for sale here) + Smoke Corners + Angel Eyes + OEM Xenon Headlights + Yellow High Beams. Some videos were taken at night, some daytime.
At night
Daytime
