Hi guys,
Since many of you ordered the LED DRLs, I have often been asked for complete instructions on how to remove the front headlights and how to break them apart.
So in this post, you will find 3 instruction guides.
a) Wak’s Eclipse Lights & Clear/Smoke Corner Fitting – (Step by Step Instructions with Images)
b) Jeff Bipes’ Angel Eyes fitment guide (Step by Step IMAGES ONLY)
c) Bentley’s Repair Manual Headlight Removing Guide
I am 100% sure you will be able to do it, following these guides. The process is quite long for the DIY guy that is at his first try. I would use Wak’s guide as the primary guide and use the two other ones if questions occur.
Since the two first removal guides are links, you will find Bentley’s guide below. Here it goes:
Removing headlights
1. Remove the Front Wheelhousing Liner
2. Remove the Front Bumper
3. Removing headlights
4. Adjusthing the headlights
1. Remove the Front Wheelhousing Liner
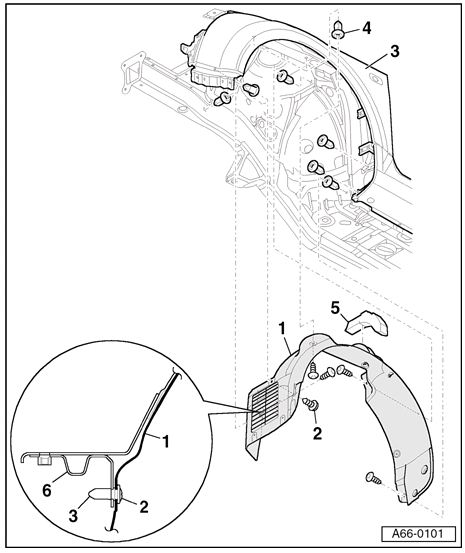
 1 – Front wheelhousing liner
a) Remove front wheel before removing wheelhousing liner
b) Unscrew Torx bolts -2- (13x).
c) Disengage wheelhousing liner from fender and pull it out downward.
2 – Torx bolt (T25) at 1.5 Nm
3 – Wing
4 – Expanding clips (7x)
5 – Seal
Self-adhesive, glued onto wheelhousing liner
6 – Fender brace
2. Remove the Front Bumper
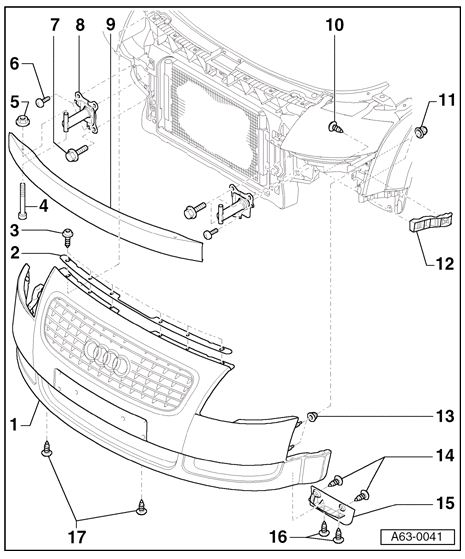
Front bumper, removing, installing and assembly overview

1 – Trim
Removing:
Open engine hood.
Detach front part of wheel housing liner
Remove screws -3- and take off securing strip -2-.
Remove screws -14- and -16-, then detach wheel spoiler -15-.
Release quick-release fasteners on wheel housing liners and noise insulation (FIG2)
Remove screws -17- at bottom of trim from noise insulation.
Unscrew nuts -11- from inner side of wheel housing.
Loosen screws -10- and press guide profile -12- slightly downward.
CAUTION!
If guide profile is not loosened, trim cannot disengage from retainers, and paintwork may be damaged. Detach hose at connecting piece on vehicles with headlight washers. Detach trim toward the front.
2 – Securing strip
3 – Combi screw: 6 Nm
4 – Combi bolt: 35 Nm
5 – Securing nut: Hold nut with open-ended spanner when tightening combi bolt -4-
6 – Cross-head bolt:
For pre-assembly
Unscrew when removing bracket -8-
7 – Hexagon bolt: 35 Nm
8 – Bracket
Trim -1- and bumper -5- removed
To remove, unscrew bolts -7- and pull bracket out of longitudinal member
9 – Bumper
Trim -1- removed
To remove, unscrew combi bolt -4- and detach bumper
Note: Clips must be pressed into fender before installing bumper (FIG1)
10 – Screws: 1.5 Nm
Before detaching trim -1-, loosen screws so that retainers on guide profile -13- disengage from trim.
11 – Hexagon nut with collar: 6 Nm
Only accessible after removal of wheel housing liner
12 – Guide profile
Trim -1- engages in side of guide profile
To enable trim -1- to engage upon installation, press guide profile upward as far as it will go and tighten screws -10-.
13 – Expanding clip
Expanding clips must be pressed into fender before installing trim -1- (FIG1)
14 – Self-tapping screw: 1.5 Nm
15 – Wheel spoiler
Detach before removing trim -1-
16 – Self-tapping screw: 1.5 Nm
17 – Combi bolt: 2.5 Nm

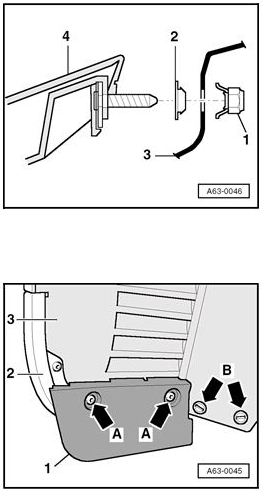
FIG 1 & 2
Fig. 1 Pressing in expanding clips
Before installing trim -4-, it is necessary to press clips -2- into fender -3-.
Tighten hexagon collar nut -1- to 6 Nm.
Fig. 2 Detaching wheel spoiler
Unscrew Torx screws -arrow A- and 2 screws from underside.
To detach wheel housing liner, release quick-release fasteners -arrow B-.
3. Removing headlights
 Disconnect battery
Remove front bumper trim
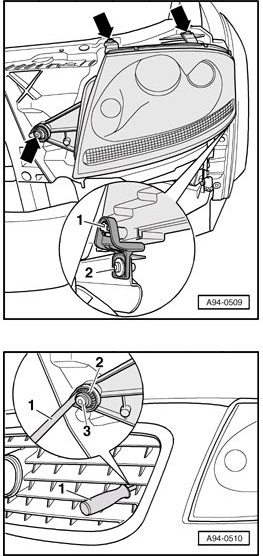
Remove screws -arrows-.
Slide headlight towards radiator in order to disengage mounting pin -1- from retainer -2-.
Disconnect electrical connections.
Remove headlight housing from opening.
Installing. Install in reverse order of removal, noting the following:
Connect electrical connections.
Engage mounting pin -1- in retainer -2-.
Install screws -arrows- and hand-tighten only.
Install front bumper trim
Check headlight housing alignment with bumper trim. If alignment is necessary, proceed as follows:
Loosen screw -3-.
Turn adjuster -2- as necessary to bring headlight housing in alignment with bumper trim.
Tighten all screws -arrows-.
Reconnect battery
Check/adjust headlights after installing
Tightening torque: Headlight housing to lock carrier: 6.5 Nm
4. Adjusthing the headlights
Halogen headlights, adjusting
Special tools, testers and auxiliary items needed : VAS 5107 Optical headlight aimer
 Adjustment screws on left headlight shown. Arrangement on right headlight is mirror image.
1 – Not applicable
2 – Height adjustment screw
3 – Lateral adjustment screw
Turn adjustment screws to achieve specification

Wow – awesome article Andre. one question though – where did you get the diagrams? they’re fantastic!
Hi Jay,
They are from Bentley Publishers.
Great source of repair manuals.
Cheers,
Andre
Will this work with a 2001 TT?
Hello,
Absolutely!
Every year of the MK1 TT; 1998-2006.
Cheers,
Andre
Hi Andre,
Thanks for the blog. It is possible to just purchase the lens somewhere. Mine is scratched up and If I could just buy the lens, I can replace my old one using your instruction.
Hello,
To this day, I still haven’t found any supplier for the lenses.
If ever you find one, let me know!
Cheers,
Andre
Pingback: algum membro sabe como retirar o esguincho lava farois audi tt?
Andre, Do you have a section or link for simple schematic on how everything is powered
Whats powering the DRL, is there wires being tapped etc.. Also, angel eyes, where is the power drawn? Great HOw to by the way with links and headlight removal..
Hi Bernel,
Unfortunately, I do cannot publish this information for competitive reasons.
But when you purchase the DRLs, you do get a complete install guide.
FYI, the DRLs are powered from the fog lamps. So this install cancels the fog lamps, but the LED lights replace their lighting power!
Best,
Andre
Hello Andre,
Thanks for this article.
Question: What is the difference between the following TT head light part numbers:
8N0941 004 S
8N0941 004 AQ
8N0941 004 AS
Cheers,
Seb
Not sure, I’d have to contact the right people.
Did you find the answer yet?
Pingback: Changing headlights
thank you for the post….can i transfer my 2002 TT Xenon hardware and place them into a 2002 halogen headlight assembly? My lenses are bad and I can get a new set cheap but a stated the new assemblies were bought for halogen bulbs
Hello Markus,
Just switch the lenses! 🙂
Cheers,
Andre